Converting Hair for Oblivion
I fell in love with some of the hairs my characters used in other Bethesda games and I wanted to grab them from Skyrim and Morrowind.
Kartoffel made a nice video that shows how to create hair for Oblivion using Blender 2.79.
This video also explains how to get hair from sims games and how to create hair that can be adjusted in length ingame, which I didn't bother with. Check it out!
Now, I am lazy and I use Blender 2.49 and I didn't feel like changing it just to follow that guide, so I started from scratch.
I used:
Nifskope 2.0
Blender 2.49, the portable version by Room207
The Conformulator
You will need either Photoshop or GIMP with the DDS plugin to create textures.
Here's how I took Skyrim hair and made it work in Oblivion. I recorded a video of it, but since there is no explanation (I hate talking), there is a step by step description below. Please note that the description alone :
1.) First thing I did was import a working hair with visible hairline (vanilla or modded), a head, some ears and an upper body into blender. If you are not using any replacer mods, you should unpack your Oblivion - Meshes.bsa. I then moved the head, ears and body in a position that looked good with the hair (while not moving the hair at all) so I knew the hair I import next would be properly positioned as soon as it fits on the head.
You can download a file like this at the bottom of the site. I created this from scratch with the vanilla body, it's not the one I used in the video, so it's not tested.
2.) I picked the hair I wanted to convert. Skyrim hairs have two corresponding nif files: A hair.nif and a hairline.nif. For vanilla (and some) modded hairs, those files differ. For many modded hairs, those files are the same, but use different alpha settings. In the next steps, I'm using a vanilla hair, so I need to import both. If both are the same, it's unnecessary to import both, since Oblivion hairs need to be one file with one object inside.
3.) I opened the hair in nifskope, selected the model by left clicking on it (so you see all the green lines) and and chose file > export > export .obj. This allows you to save an .obj and an .mtl file somewhere on your HD. Obj is the object itself, mtl is material information. I exported both, the hair.nif and the hairline.nif.
4.) In blender, I chose file > import > wavefront (.obj)... and imported both obj files. I did not change any import settings.
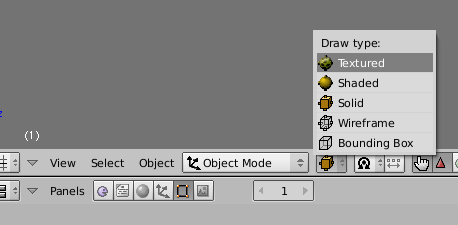
It's helpful to set the draw type to textured, otherwise you'll have solid grey objects.
To correctly display textures, you can add multiple paths where the textures are found when importing nif files:

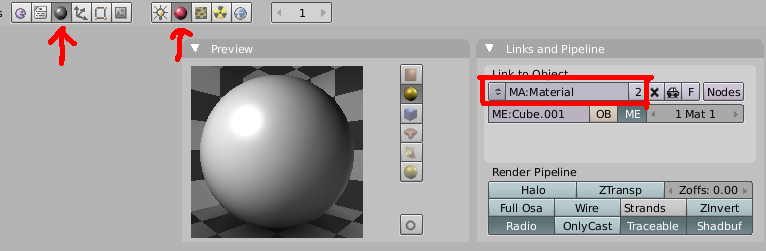
5.) Now is a good moment to save the project, in case something goes wrong. We need to merge the two objects, but they need to have the same material or they won't be exported as one object. In blender, in the button window, shading panel > material buttons (as shown on the picture below) I selected the same material for both objects. They will probably be named like Material and Material.001 or anything similar. Just assign the same material to both hair objects.
If you have imported something that is not properly textured (perhaps from sims or whatever) now would be a good moment to make sure the texture is added and fits before you continue.
6.) Now select both objects in object mode at the same time. Hold shift and click on both, so they both are outlined. Press control + J and join the meshes.
7.) Go into edit mode, select all vertices by pressing A until everything is highlighted, click on mesh > normals > recalculate outside. (This is probably not needed if you don't have to merge a hair with a hairline.You can test export the hair and check it in NifSkope, if it looks fine without this step, it's probably fine.)

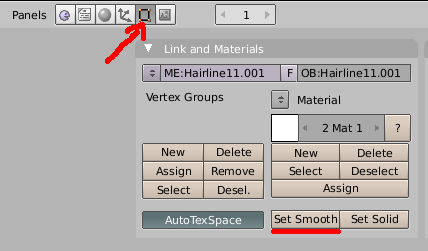
8.) In the buttons window, in the editing panel, click on set smooth (see picture below).
If it's your first time, now you could test export and see if it looks good. Jump to point 11, follow the instructions, check if it looks ok, if yes, continue at point 9.
9.) Now we need to move the hair into the right position. Don't move the hair in object mode. Go into edit mode, select all vertices. First, we want to get the hair upright. It will most likely be a straightforward number. For my Skyrim imports, I could rotate it by pressing r (for rotate) followed by x (on x axis) followed by the number 270 (degrees, I entered on the numpad) and enter (confirm). Was the same for all hair and quicker than manually turning. You can experiment to find your number, right click cancels, left click confirms.You can just press R and then x,y or z to rotate it along an axis.
10.) Remember, don't move the hair in object mode. Go into edit mode, select all vertices (pressing A) and move, scale, edit, do whatever you need to make the hair match your head. Honestly, this is such a short point, but probably the process that takes the longest about it all.
11.) Go into object mode, select the hair and press control + A. Select Scale and Rotation to ObData.
12.) Now export the hair. Go into object mode, select your hair object, and then in the menu file > export > net immerse (nif). Enter a file name and press export. Below is a picture of settings that worked for me, important is to uncheck stripify geometries.
After export it's important to check that the exported hair is all in one object. There could be some empty looking NiTriShape in the nif, that's no problem, but if you click on the hair everything should be highlighted.

13.) Expand the tree in nifskope. If there is more than one NiTriShape, click on them. One of those should highlight all of your hair. Keep that one. Delete the other(s) by right clicking, block > remove branch.
14.) In the NiTriShape you kept, rename the material to hair. You could set the Ambient/Diffuse/Specular/Emissive colors of the material properties to match vanilla hair. They are
ffffff (1/1/1),
ffffff (1/1/1),
e5e5e5 (0.9/0.9/0.9) and
000000 (0/0/0).
You could adjust the alpha properties, depending on the texture a threshold of 0-125 might look good. The flags should be 4845.
If there is no NiStencilProperty, add one by right clicking on the NiTriShape > node > attach property > NiStencilProperty. This allows the texture to be displayed double-sided.
14.) Add vertex color. Select the NiTriShapeData, double click on the value for "Has Vertex Colors" (turns from no into yes) and then set the color to aqua. Click on the colorful icon that appears once you've activated vertex colors, right click on the Chose a Color window that appears and select the color named aqua (00ffffff).
Note: In the video I chose a random color. If it's the wrong color, the hair doesn't dye properly.
15.) Now we open up the Conformulator. As head file, you should use whatever head you use in your game. If you don't use any mod that adds new heads, you need to unpack your Oblivion - Meshes.bsa. The tri and the egm file need to be in the same folder when you select it.
As hair file, you use your newly created hair. Then press conformulate.
I am not sure if tri files for hair are necessary, I didn't create them for now, but if I find anything weird when people talk, I can always generate the tri files later.
16.) Now it's time to test the mesh ingame. For now, you can keep the textures that came with the mesh, but you should copy the texture two times, and rename them: texture.dds, texture_hh.dds, texture_hl.dds (and of course, keep the texture_n.dds).
I personally find it pretty easy to create a quick test plugin in tes4edit.
In the video I use an old version of tes4edit, because it loads faster and I really don't need any fancy new features for this simple step.
Easiest is picking a hair record, copying it as override into a new file (as described here), then changing the model filename to your nif, and the icon texture path to your texture. The texture path inside the nif doesn't matter at all.
You could, of course, create a new hair, but then you need to assign it to a race, too.
17.) If everything works so far, now it's time to edit the textures. Depending on where you got them from, they might not be grey-scale. You should turn them into grey-scale (or pretty close to it), so they can be dyed better by the game without having a weird tint to them.
Normal textures require the texture and a normal map, hair also requires a _hh and a _hl file. I looked at a few hair mods to see how they handle them, and not all had the same approach.
For some mods, all 3 files were exactly the same. It works.
For other mods, they were the same texture with different alpha channels.
The texture.dds file has a "normal" alpha channel, just for transparency.
The texture_hh.dds file has no alpha channel, making it fully solid.
The texture_hl.dds file has the texture copied into the alpha channel (or similar).
Sometimes all 3 textures are different, with the alpha channels as described above.
The texture.dds file is pretty much grey-scale.
The texture_hh.dds is grey-scale and blurry.
The texture_hl.dds is a bit more colorful.
Really, I suggest looking at a few hair mods (like nuska's texture from oblivion character overhaul 2) or even just the vanilla hair and then experimenting.
That's it. This should work with many things you can get an obj. file from. Not all hairs will fit the oblivion head well, some might need to be textured and some might be hard to edit, if they have many overlapping layers.
For the player character, creating wigs instead of real hair is a better approach, since they suffer none of the problems hairs have: Namely transparency turning the hair invisible if overlapping with another transparent object, not being rigged and clipping during animations and being limited to one object. I have no idea how to do that yet, perhaps one day in the future.