Modding Oblivion on Steam/Linux
This is planned as a simple post, just outlining the differences between Steam and GOG (as described in my or Kat's guide). The goal is to have Oblivion via Proton, with OBSE, a working Wrye Bash and the Construction Set.
Let's see how that goes.
Step 0)
Guys! Check out this blog entry here of someone who actually plays this game on Steam :D This seems to work with newer proton versions as well and I currently don't have the time or brain cells to update my guide.
My method has problems with proton versions newer than 5, I believe.
Step 1) Install Oblivion through Steam.
If you're playing on Linux, you most likely already know how to enable Proton for all titles. Just in case:
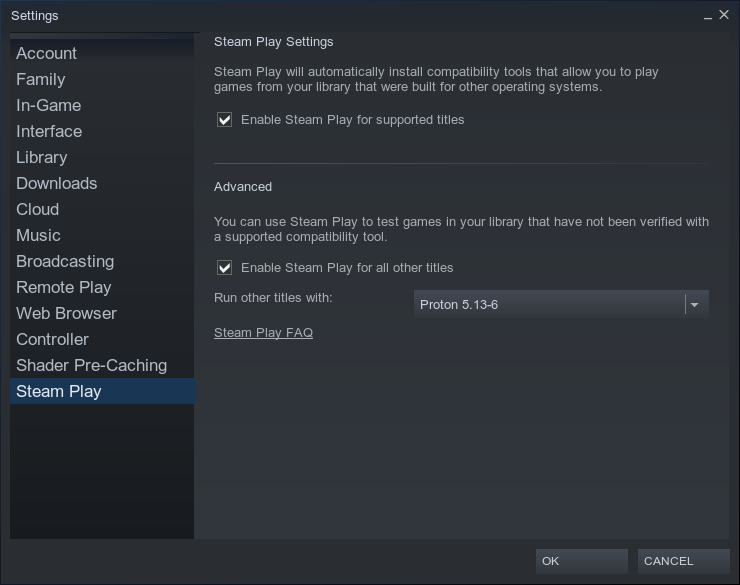
Once this is set, you can install Oblivion normally.
Step 2) Launch it.
You want to make sure it works. Skipping the annoying intro videos doesn't work on Linux, so you might want to edit the ini to remove them.
SIntroSequence=
You should also set all other settings, like resolution, graphics, perhaps keybinds. As on windows, if you have a controller plugged in and don't want to use it, set
bUse Joystick=0
Unfortunately, this is not the place to help you get the base game up and running. I'm not really playing on proton myself, and I did encounter some problems like needing to select a certain proton version or having to add "PROTON_USE_WINED3D=1 %command%" to the launch options. If you are having trouble, protondb might prove useful, to see how other people solved theirs.
Only continue if your game works fine unmodded!
Step 3) Understanding Steam Locations.
Steam has two locations for your game files. One is the game directory, one is the prefix which includes folders for your ini and savegames.
From now on, I will assume that steam is installed in ~/.local/share/Steam. If you installed steam somewhere else, or made another library and installed Oblivion there, you need to adapt the paths appropriately.
Assuming that, your Oblivion directory would be here:
~/.local/share/Steam/steamapps/common/Oblivion/
Steam creates a proton prefix directory for installed games. Instead of in the common directory, it's in the compadata folder and instead of the game name it uses the game ID. Our prefix folder would be:
~/.local/share/Steam/steamapps/compatdata/22330/pfx/
Inside this prefix, you will find a structure similar to Windows. You will find your savegames inside drive_c/users/steamuser/My Documents/My Games/Oblivion/.
Step 4) Installing Wrye Bash.
We'll be using the Standalone Executable. You can find it on Nexusmods, but if you encounter any problems, you should join the discord and test the WIP version. At the moment of writing this, there is a lot going on about moving it over to python 3, so the occasional bug will crop up.
We take the Mopy folder and put it into the Oblivion folder.
Now, the next tips I got directly from Kat's blog, from this post in particular. We want to launch Wrye Bash in the same prefix as Oblivion, with the same proton version.
I used Proton 5.0 when writing this, because 5.13 didn't work. You should use whatever Proton version gives the best results for you. Assuming default file paths, you would enter this into a terminal:
STEAM_COMPAT_DATA_PATH=~/.local/share/Steam/steamapps/compatdata/22330/ ~/.local/share/Steam/steamapps/common/Proton\ 5.0/proton run ~/.local/share/Steam/steamapps/common/Oblivion/Mopy/Wrye\ Bash.exe
Let's explain this:
STEAM_COMPAT_DATA_PATH=/path/to/compatdata/22330/ /path/to/Proton\ x.x/proton run desired.exe
Similarly to WINEPREFIX=, we set the path to the steam prefix.
Then we set the path to the proton version we want. Proton versions are in the "common" directory beside all your games

Keep in mind that all those versions have a space in their name. To use it in the terminal, we need to escape it with a backslash like Proton\ 5.0.
Then we just type run.
And lastly, we type the path to the exe we want to run, in this case Wrye Bash.exe (which also needs to be escaped with a backslash).
For me, it takes about 20-30 seconds for Wrye Bash to start up. Wait patiently (or impatiently, but wait a while) unless the terminal spits out errors and/or cancels the process.
Step 5) Adding mods through Wrye Bash
As on Windows, the Oblivion Mods directory will, by default, be next to your Oblivion directory, so:
~/.local/share/Steam/steamapps/common/Oblivion Mods/Bash Installers/
Drag & drop of mods into the installers tab of Wrye Bash should also work on Linux, but if it fails, you can always navigate to this directory and put all your mods inside. If you want a different location, you can set it in the ini, similarly to the path described in Step 8.
One thing that is different: At the moment of writing this, installing from archives (zip/rar/7z) is partially broken. Some files will not get copied. It's best to just unpack all mods manually and the install the unpacked ones.
It won't work to launch Oblivion from Wrye Bash directly, you need to start it through Steam. You also need to close Wrye Bash or the game won't start, which is a bit annoying.
Step 6) Install OBSE.
We shall be using the new fork xOBSE. It has a few improvements, but most importantly, it works fine on Linux with Steam. To install it, open the 7z archive from the releases page and copy the files into your Oblivion directory.
Then you want to rename the OblivionLauncher.exe to something else - for example OblivionLauncher_backup.exe, and rename the obse_loader.exe to OblivionLauncher.exe.
To check if OBSE works, you launch the game - through Steam! -, open the console and enter GetObseVersion. If there is no error - Obse is working. This function will not actually return the OBSE version, but it would cause an error if OBSE wasn't working.
I would keep a second copy of obse_loader.exe as well, in case you need to (or Steam decides to) verify game files. It would notice OblivionLauncher.exe is not what it should be and replace it with the original.
Step 7) Installing the CS.
Unfortunately, the Steam version doesn't come with the CS. If you want to make mods yourself, you'll have to install it manually. Luckily, it's hosted on Nexusmods.
You'll just download it and put the exe inside your Oblivion directory. Then you use the same terminal line you would use to launch Wrye Bash, but instead you use it to launch Oblivion/TES4_Construction_Set_1.2.404.exe. This will start the installation process for the CS.
Step 8) Using Wrye Bash's toolbar.
Once it's installed, you can launch Wrye Bash and start the CS from its toolbar at the bottom. I find this a very convenient way to start different tools in the same prefix, without having to make or save several commands, or type the name of the file I want. More about that in my GOG focused Wrye Bash guide for Linux.
Other than in that guide, we'll need the wine/proton drive Z: to add applications we want to launch. Z: points to the whole file system, instead of your drive_c inside your prefix.
The CS is automatically recognized, but let's say I want to install Tes4Edit. I copy the folder into the Oblivion directory (technically I wouldn't recommend cluttering the Oblivion directory, but I'm too lazy to find a better location now :p). Then I enter the Mopy directory and copy the bash_default.ini to bash.ini so I can make changes to it. In bash.ini I uncomment the line for Tes4Edit and add the path (with backslashes! We roleplay as Windows here):
sTes4EditPath=Z:\home\laula\.local\share\Steam\steamapps\common\Oblivion\TES4Edit\TES4Edit.exe
Next time we start up Wrye Bash, an icon to launch Tes4Edit will be in the toolbar.
Step 9) Last words.
If you haven't already, I would suggest binding the wall of text you need to start Wrye Bash to an alias, or create a desktop shortcut for it.
I don't actually use the Steam version. The GOG version is just much more convenient, same as on Windows. For this tutorial I got it up and running, installed my interface mod including ini edits, opened the CS and Tes4Edit and confirmed those working, but that's about it.
Also, I hope I didn't add any spelling mistakes to the file paths, because my Oblivion is actually installed in a different location.