Wrye Bash for Beginners Part 1: Installation and Installers Tab
This guide assumes you know how to install a program, how to locate a directory on your HD, how to move files and how to see file extensions, if needed. This is not a Windows tutorial.
Part 2 | Part 3
Overview
Installing Wrye Bash: Installer or manually
Some Preparations before the first start
Introduction to the installers tab
How to sort mods and why this is important
Installers details: What do colors and icons mean
Configuring a mod: Manually and with wizards
How to make a mod Wrye Bash/Bain friendly
Actually installing a mod: Just this one click
Incompatible mods: These won't work with Wrye Bashs installers
General
Installation
First we want to make sure the game actually runs before we start any kind of modding. This will also set the required registry entries if you are using the Steam version.
This is also a good moment to mention that Oblivion should be installed outside the default programs directory of windows. Some people have trouble with user access control, some don't, but why not be safe just in case?
For steam, that unfortunately requires either a second drive with a second library, or moving the whole library. It's not possible to just move the one game somewhere else and start it outside of the default folder.
Installer
1) Download the latest Installer from here. Unpack it and run it. Check "Install for Oblivion" and "Wrye Bash [Standalone]".
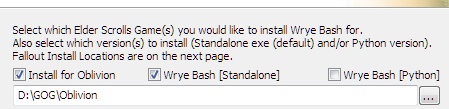
2) Don't change the path. If the installer doesn't automatically recognize where your Oblivion is installed, close the installer and launch Oblivion via OblivionLauncher.exe. This will set the registry info Wrye Bash needs to find Oblivion.
3) Wrye Bash is now installed in the "Mopy" directory in your Oblivion root directory.
4) The recently released GamePass/Windows Store version of Oblivion will not be detected by the installer. You need to manually install the Standalone Executable somewhere outside the game folder and use the -o method described below to start it.
I repeat, it's not possible to install Wrye Bash into the game directory with those versions.
Standalone Executable
1) Download the Standalone Executable instead of the Installer. You will need 7-Zip to extract the archive and get to the installer - 7z is something similar to zip, and 7-zip can handle all 7z, zip and rar achives. Most Oblivion mods come in 7z format.
2) I still live in 2009 and place the Mopy folder from that download inside the Oblivion folder. If you do this, it will run and manage Oblivion automatically. You can also put the Mopy folder anywhere else, then it will ask which game to manage when you launch it, or pick the only installed, supported game if only one is installed.
3) You can also use the -o argument to tell Wrye Bash which game to manage. For this, you'd need to know how to create and edit a shortcut to Wrye Bash.exe. As simply dropping Mopy into the Oblivion folder for now is easier, I won't be handling this here. The -o argument takes the full path to the directory the Oblivion.exe is in, for example -o "C:\Games\Oblivion"
Wrye Bash will check, in this order: the -o launch argument, the sOblivionPath ini setting, the location of the Mopy folder, and if none of those yield a result, check the registry for installed, supported games.
4) If you want to manage only one game, you can specify that in the ini, so it won't ask all the time.
Python Version
Don't.
Preparations
1) If you run a non-english windows, you might want to go into the Mopy/Bash folder and rename the l10n folder to something like #l10n. This will remove the translation for now, because otherwise you might not find the right buttons when following the guide. If you want it back, just remove the # again.
2) Usually the directory where mods are stored is on one level with the Oblivion root directory. So if your Oblivion is installed to D:Games\Oblivion, it will be D:Games\Oblivion Mods. If you don't want that, open the Mopy directory. There is a file called bash_default.ini. Make a copy of that and name it bash.ini, then open it. You then can set the value of sOblivionMods= to whatever path you like.
3) You can save and close the ini, or read the rest of it, if you want. I usually don't bother changing anything else, except for the paths to certain tools, more of that later.
4) The reason why Wrye Bash doesn't distribute a bash.ini is so it's not overwritten if you update Wrye Bash.
Installing OBSE
1) If you haven't before, and plan to install any mods that require OBSE, install it now. Download it from here. The Community Version is under development again and will most likely get the occasional fix or feature. Make sure to download the file that is called OBSE[version number].zip.
2) Copy the contents of the archive (except for the directory src if it exists, though it doesn't hurt if you do, you just don't need it) into your Oblivion directory (not Data) where the Oblivion.exe is.
3) If you see no file Oblivion.exe because your file extensions are invisible, change that now. Usually you can turn file extensions on somewhere in Windows explorer, under options > view > uncheck "hide known file extensions". This might not be 100% accurate, because my Windows isn't English. Some mods have the same file name for their esp, esm, bsa and ini file. It is crucial that you can see the difference.
4) OBSE itself and ENB + Presets are the only kind of mods that cannot be installed through Wrye Bash that I know of. Some others might need a bit of repackaging before they work.
Tools, of course, can also not be installed with Wrye Bash.
5) From now on you'll be launching the game with obse_loader.exe if it's retail or the GOG version. For Steam, launching it through Steam will automatically load OBSE.
6) Launch the game and test if OBSE works. Enter GetObseVersion into the ingame console. If there is no error, it works. If there is no output, or it outputs a version, it works. Only if there is an error that the command couldn't be found, it doesn't work.
Important
1) I don't think it's as big of a problem as it was 10 years ago, but from time to time, when handling huge amounts of new mods and/or after you've configured a lot of things - just close Wrye Bash and open it again. If it ever crashes for some reason, there could be changes lost and you might have to redo them.
2) For example, if you install a mod and Wrye Bash crashes, it will forget the mod was installed. The files will still be there, but Wrye Bash won't be aware that it installed them.
3) In general, you can find most menus by right clicking. Right clicking on the header of a column gives you general options, right clicking on a mod, installer or savegame gives you options for that object. If in doubt, right click.
4) Similarly, hovering over a lot of things gives you an explanation what it means in the status bar.

4) If you ever don't see any of the windows I'm describing, try to pull them out. They might just be very small for whatever reason. This used to be true for the master list in the mods tab. The points where the mouse cursor turns into the arrows for this are a bit strange sometimes.

Please note: In the latest latest version, the masters and the bash tags windows are now side by side and should be visible without any problem.
5) If you're coming from Skyrim, you're probably wondering why I use Wrye Bash over Mod Organizer 2. Well first of all, MO2 has only recently be made to work well with Oblivion and OBSE on Steam. A lot of people that have been playing and modding Oblivion for years just couldn't use it before, and a lot of mods come with BAIN wizards that have been unsupported for even longer and were just recently added.
Another good point is the fact that the Bashed Patch is a very important part of Oblivion modding. For Oblivion, it's way more advanced than for other Bethesda games. So you will end up needing Wrye Bash anyway, and if you use MO2, you'll just have to launch it through MO2. I personally don't bother using 2 programs when one could do the trick.
Lastly, while other games may have a bunch of loose files in the data folder which could be overwritten by mods (which is no problem with MO2), Oblivion doesn't have many loose files. Almost all Oblivion files are in BSA archives, there really isn't much you can break by installing directly into the data directory.
The exception to that is mods that replace the video, music and shaders. Installing those mods will overwrite your vanilla stuff, making it impossible to remove them again unless you made a backup.
The official shaders can be downloaded on nexusmods. Most music mods don't replace but add files and there are very few video replacers out there.
One famous mod that overwrites the vanilla shaders (strangely enough, last time I checked just with... vanilla shaders!) is Oblivion Reloaded Lite, which means after you uninstall it, it will take down those vanilla shaders and your game won't launch anymore. So keep that in mind if messing with ORL.
Now I'm not saying you shouldn't use MO2. If you are familiar with MO2, just use it, what's the problem, no one is stopping you. (It works just fine. Unlike OBMM, NMM and Vortex. Those have issues.) It recently even got support for BAIN wizards (though I think it fails on wizards that include version checks) and the only mod I know of that causes problems is nvac, which isn't needed anymore anyway. But you know what I'm not doing? I'm not writing a guide for it, because it's not a program I use.
Running Wrye Bash
1) You can now start Wrye Bash by clicking the Wrye Bash.exe in said Mopy directory.
2) Do so.
3) Now tenderly stroke the top of the window with your mouse cursor. It's a good program and doesn't deserve all the hate it gets. Too complicated, pff.
4) At the top you should have 5 tabs: Installers, Mods, Saves, INI Edits, Screenshots.

We will go from left to right.
Installers Tab
Activating
1) Click on the Installers tab. Wrye Bash should ask you if you want to activate it. Say yes. If, for some reason, you didn't, right click on the header and make sure Enabled is checked.
2) Also make sure Avoid at Startup is checked, this will save you some nerves, and BSA redirection is on. (If you are using SkyBSA, you won't need BSA redirection, but I don't think it hurts, either).
Additionally, I recommend checking Auto-Refresh Projects and Wizard Icon Overlay. Those should be on by default anyway.

3) You can open the mod directory by right clicking on the header and selecting Open. This folder is where you drop your downloaded mods. A lot of mods should work out of the box - either because they are BAIN (BAsh INstallers) formatted or have a simple file structure. Move everything you want to install into that folder.
4) You can also just drag mods into the installers tab. Wrye Bash will ask you if you want to copy them or move them there.
This will not work if you launched Wrye Bash as admin.
5) Go back into Wrye Bash. It might need a while (maybe a long while, depending on the amount of mods) to scan them all, then provide you with a list. You can even drop .omod files in there, Wrye Bash will attempt to unpack them. Not all .omods have an easy to use file structure inside them, though.
The entries in this tab should be sorted by order.

Sorting Mods
1) Installers order is priority order. Mods with a low number are basically installed first, mods with a higher number last. This only matters in one regard: If two mods have the same files (maybe a general texture replacer like qarls that touches all textures, and a small one that only changes Bravil architecture), you want to sort them in a way so the one you prefer is last. If a mod has a patch or an upgrade to a later version, that one must be installed after the mod it's patching.
2) If you are following a mod list, I assume it's safe to arrange the installers in the same order. Otherwise, your best friend is the conflicts window.
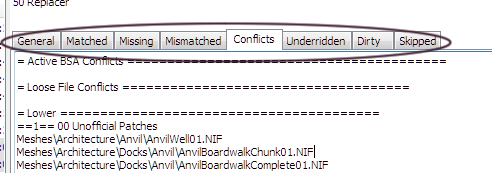
3) In the conflicts tab you can see which files conflict between mods. They are divided into lower conflicts (= this mods overwrites those) and higher conflicts (= this mod is overridden). Move the installer according to where you want it. The beautiful thing about Wrye Bash is that you can change it at any time. Notice some texture isn't what you expected ingame? Find the installer, find the conflicts, move it after the one that's overwriting this.
You can turn off the display of Inactive Conflicts (= mods that are not installed) and Lower Conflicts (= mods that are overwritten) by right clicking on the top column over the installers list. This might make it easier to spot conflicts.
4) A short explanation of the other tabs:
General is the contents of the mod, all the currently configured files that would be installed with it.
Matched is which files are installed and 100% identical.
Missing is which files are not installed, but should be according to current configuration.
Mismatched is which files are installed (same file name), but are different, either because they are overwritten by a later mod, or were hand changed.
Skipped lists files and directories that are not installed because Wrye Bash doesn't recognize them. Some are silently skipped and not listed. The only affected culprit here is - once again - Oblivion Reloaded 9.x or higher and ORL 6 or higher, which comes with an OblivionReloaded.dll.config file which is silently skipped because .config files were used by NMM before. If you are installing any of those Oblivion Reloaded versions, manually copy that file into Data/OBSE/Plugins.
Lastly, Underridden and Dirty usually happens when you change the order of installers and can be fixed by right clicking on the mod and selecting Anneal. Except for curiosity while actually creating mods, I barely check those.
Installer Details
1) Installers can have several colors or symbols that might be confusing at first, but allow to see the status of a mod at first glance.
Shape  Squares are archives (zip, rar, 7z).
 Diamonds are unpacked directories (also called "projects").
 A + inside either icon means this mod was installed.
Icon Color
Red - Mod is not installed or files are missing
Orange - Mod is installed, but esp/esms don't match
Yellow - Mod is installed, but some other files don't match
Green - Mod is installed, files match 100%
White - Mod has Sub-Packages, but none are selected
Grey - Wrye Bash doesn't recognize this structure and can't install it
Background Color
Grey - Some files were skipped
Orange - The install is dirty. Can be fixed by right-clicking and selecting Anneal.
Yellow - The install has underrides. Can be fixed by right-clicking and selecting Anneal.
Both yellow and orange background color happen occasionally when moving packages around.
Text Color
Navy Blue - This is really hard to see. It means the package has sub-packages.
Grey - Wrye Bash doesn't recognize this structure and can't install it
Packages starting and ending with ==, for example == Replacers ==, are markers. You can create them by right clicking on the header, selecting Add Marker... and renaming them. They are only used for convenience, if you want to visibly group mods between two markers.
2) In general, every green, yellow and most orange icons are fine (orange usually happens if you cleaned a mod after installing or installed a patch on top of a main file). In case of patches, just make sure to really load the updated esp last, and you can also just uncheck the esp in the outdated packages so it all turns yellow again.
If the icon is grey or red, you need to look into it.
If a mod has a yellow or orange background, hit Anneal.
Configuring a mod
Manually
1) Some installers have sub-packages and/or several esp/esms. You can select what to install on the right side by checking and unchecking boxes.
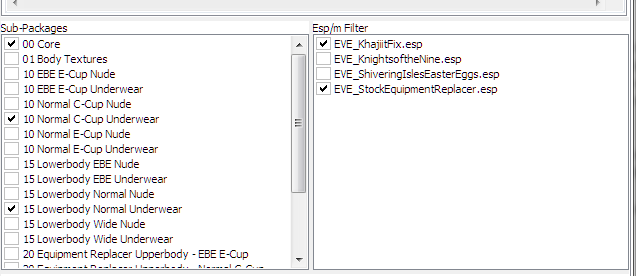
As you can see, I selected some of the sub-packages and some of the esps of this mod. This structure is commonly used for mods that have alternatives/different versions. To sort the sub-packages, they are usually named with a two digit number in front. 00 usually is the "core", meaning it must be installed. Other options are often grouped up, like here all the different cup sizes. If several options have the same number, it usually means you have to pick only one of those.
In this example, all the 10s are for the upper body, you have to chose between EBE and Normal, C-Cup and E-Cup, Nude or Underwear. There is no point in selecting more than one of the 10s.
2) Additionally, you can uncheck some esps, like patches for mods you don't use.
Wizards
1) Some mods have a Wizard. They have a special Icon. 
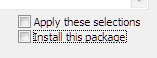
2) In newer versions of Wrye Bash, selecting install will automatically start the wizard if one exists. It will guide you through the installation process. At the end, you have the choice to apply your selection, install the files or both.
3) Any Ini Tweaks created by wizards should be auto applied in latest versions of Wrye Bash. It can't hurt to switch to the Ini Tweaks tab and double check, though.
Making a mod "Bain Friendly"
Some mods are not recognized by Wrye Bash. This is often the case with very old mods, from a time when there was no mod manager and no common structure, but also .omods and their ability to just have whatever file structure often cause this.
Method 1 - Manual
1) The probably easiest fix is if the mod files are just in a knee deep file path like "Modname\Files\Mod Name\Data\" or any other variant where a clear Data folder exists in the mod, but Wrye Bash is unable to find it. Just create a new folder inside your Bash Installers directory, give it a nice name, and make sure the file structure starts as if you were inside the Data folder: Inside the new folder should be the esp/esm and the directories meshes and textures etc (of course, only if that mod has all of that in the first place).
2) If the source is more complicated, do the same, but you might need to at least know a bit what you are doing. Fish for the files you want and place them in the right structure into the new directory. Sometimes/often those mods have instructions for manual installation. You can probably follow these, but, instead of moving them to the Data directory, you move them into your newly created folder.
3) There is a possibility that mods used complicated obmm scripts to install, which would make this process harder and probably be easier to use the next suggested method below, but to be honest, I can't think of a single mod that does.
Method 2 - Monitor External Installation
1) If you right click on the top column in the installers tab of Wrye Bash, you can select an option called Monitor External Installation. Depending on your installation size, this will take a long time, so if you can do it manually, that's probably preferred. If not, press that option.
2) A window will pop up, telling you to install your mod. You can now follow whatever install instructions to put the mod directly into your data folder, be it installing it with oblivion mod manager or as an exe file.
3) Once the mod is installed, hit OK on the popup in Wrye Bash. It will scan the folder again and then present you with a window of all the files it found that were added to the data folder. Press create project and add a name.
4) You can now probably remove it with whatever way you installed it with (for example, if it was an exe installer, I dislike having it left in my programs list), just so it's a bit cleaner, then reinstall with the newly created Wrye Bash mod.
Actually Installing Mods
You know when I said to occasionally close Wrye Bash and open it again? If you haven't done so yet, now would be a splendid time to do so, so all your preparations and orders are saved.
Just Install
1) So now your mods are sorted and configured, right? Right. Right click on the mod. Select Install. Done.*
*If your mod has a wizard, it will now run.
2) You can install all mods at once, or one by one, or in batches. Installing many at once might take a long time. I personally wouldn't install more than a few at a time.
3) If you change your package order after you've already installed a few, some might turn yellow or orange. If that happens, right click on them and use Anneal. Unless for some reason you are making changes to mod files in the Data folder, it should always be safe to use anneal after you've changed something.
4) Anneal will not correct changed esps, so if you've cleaned them, they will stay that way. The installer icon will turn orange, though.
5) You could grab all your cleaned esps once you're done with everything, stuff them into a new folder in your installers directory, call it cleaned esps and move it to load last in BAIN. This will also keep them safe should you ever (accidentally or on purpose) replace them with an uncleaned version.
This will also keep cleaned DLCs safe that would be reset by verifying game data with steam.
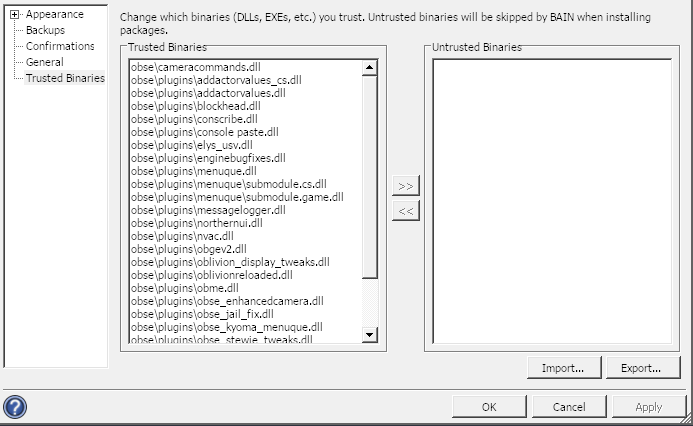
6) If the mod contains any dlls (OBSE plugins), Wrye Bash will ask you if you trust them. Answering no is semi-permanent and will leave you unable to install that certain dll with Wrye Bash unless you reset some settings. To change which dlls you trust, click on the little cogwheel in the status bar and select the option Trusted Binaries. There you can move dlls from Untrusted to Trusted and back.
6) If you want to uninstall a mod, you might have guessed it: Right click on the mod and select Uninstall. If by uninstalling a mod the conflict status of any resources changes, Wrye Bash will handle it automatically.
7) Similarly to Anneal, Uninstall will not removed changed esp or ini files. I assume this is so you don't lose your changes or configs.
Advanced Installation
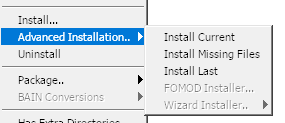
1) Instead of just pressing Install, you can select Advanced Installation. This is useful if you changed a package after initially installing it. Say you installed it already, and now want to add an additional esp/subfolder that you had unchecked previously. You could select "Install Missing Files" to only install files that were not installed before.
Careful: This will not install files that have been installed before, even if they would be changed now in the new config.
2) If for some reason you don't want to run the wizard, you can also manually make your selection like in any other mod and select Advanced Installation > Install Current.
3) Wizards also have the option here to run with default settings, as far as the the modder provided them, or to let you view the wizard script.
4.) Install Last will install the mod at the position of the ==Last== marker.
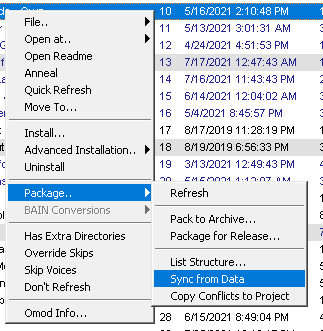
5) If you want to make changes to the archive itself, you can unpack it from Wrye Bash. Right click on the mod and select Package > Unpack to Project(s).... A double click opens the archive or directory, so you can look inside, and, in the case of a directory, edit files directly.
6) If you cleaned any mods or made changes and want to preserve them, you can click on Package > Sync from Data. This will give you a list of changed files that you can pack into the mod file. This works on both, archives and directories.
If you want to add cleaned esps back into the mod file they came from, or keep them all in a separate folder, is a matter of preference. I would suggest using one way or another to keep them safe, though.
Mods that cannot be installed with Wrye Bash
There are a few mods that cannot be installed with Wrye Bash. They are few and far in between, as most mods I know of have alternatives, for example the famous DarNified UI has a BAIN friendly repackage here.
Realistic Leveling requires manually editing the ini, as it ships with placeholder values in its ini that would get set by the OBMM install script. However, I would suggest checking out Ultimate Leveling, which has a RL mode and is much more modern and should not carry the same bugs RL did.
The full package of QTP comes in 11 (eleven) .omods, but there is a BAIN friendly redimized version and in 2021 there are several other retexture packs available as well.
There are mods that directly edit the shader packages of Oblivion, a thing only OBMM could do. However, I don't think most of them work well nowadays, and would be especially incompatible with ENB and Oblivion Reloaded, which most people use these days. I honestly would stay away from modifying the game shaders.
The only mod that I know of that just doesn't work, at all is Horse Armor Revamped, which is a requirement for Universal Horse Armor. It has an elaborate, bsa extracting and mesh modifying script that no other tool can handle. But, to be fair, I also didn't manage to install it with OBMM, lol.
Edits:
2020-03-08: Added how to display file extensions. Added more methods to convert mods into bain friendly packages.Added a warning about shader and video mods.
2020-04-22: Added info about too small master list and about the restructuring of the menus.
2021-01-02: Added Advanced Installation, manual install of standalone executable, status bar.
2021-04-15: Added how to get rid of translations back, added info about the -o argument.
2021-05-13: Added info about the GamePass version.
2021-07-25: Too much to list. MO2/Sync from Data/Move steam library/much more.